

Thursday 25 March 2010
Performance tips for Cocos2d for iPhone

Cocos2d for iPhone is a wonderful open source framework that makes it easy to draw 2D graphics with OpenGL ES. It allows to you unlock the power of the graphics hardware in iPhone OS devices, without having to deal with all the details of working with GL. Having said that, using Cocos2d is a great way to get your feet wet with GL programming. I’d never done any OpenGL stuff before, but I found I picked up quite a bit as I went along. It handles most of the hard stuff, but it’s very easy to subclass and handle drawing yourself as you become more experienced.
When I started working on the bizarre experiment that eventually became Space Harvest, I initially used Core Animation. This is great, up to a point, but I found I soon hit a performance wall - Core Animation wasn’t flexible enough to handle the types of things I wanted to do, and doesn’t really give you a lot of control over what’s happening under the hood.
Once I switched to Cocos2d, I found that a) it was a lot easier to get something that ran relatively smoothly, and b) because it’s designed for games, it provides loads of functionality to make your life easier.
This post is about some of the things I learned about improving performance when using Cocos2d. A lot of the time, I found out about this stuff by doing it the wrong way to start with. Though I doubt they’ll be anything here for experienced game developers, I hope my tips may be useful to anyone who (like me) is quite new to OpenGL and game development.
Profiling with Instruments
As with any software, before you start doing any work to improve performance, you should first look for where the bottlenecks are.
Run your project with the CPU sampler instrument to see where your program is spending its time. Though you can sometimes get valuable results by profiling on the simulator, you should try to do as much profiling on the device as possible. You probably already know the device usually runs software much slower than the simulator, but this is even more obvious with CPU/GPU intensive software like games. The device is MUCH slower at certain things than the simulator, so the only real way of seeing where the actual performance bottlenecks lie is to run on the device.
I find the most helpful way to start looking for potential performance bottlenecks is:
- Change Sample Perspective to ‘Running sample times’
- Change Active Thread to ‘Main Thread’. 99% of the time, the performance intensive parts of your game will be single threaded (on a single core device like the iPhone / iPod touch, it wouldn’t really make sense to do it any other way)
- Turn off invert call tree, and expand the list until you find [CCDirector mainLoop]
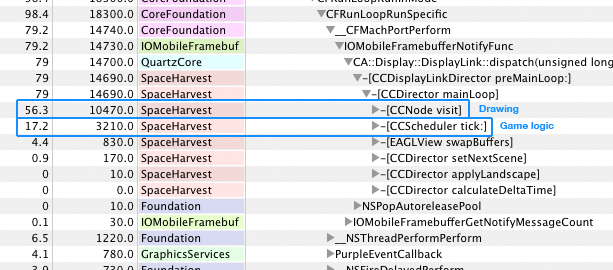
They’ll probably be two main places where your application will be spending its time - drawing, and running your main loop for game logic.
Always look for the low hanging fruit - those parts of your code that are taking up lots of time, and can be easily optimised. If your game is spending any significant amount of time in [CCScheduler tick], you should start your optimisation work there. Optimising your game logic will usually be less painful than optimising your drawing.
Testing on different devices
For most iPhone OS applications, the differences in hardware between devices is not particularly significant. Users might notice that things are a little more snappy on newer devices like the 3GS newer iPod Touches, but generally, it isn’t a big deal.For games, the performance gap between the older devices and the newer ones is HUGE.
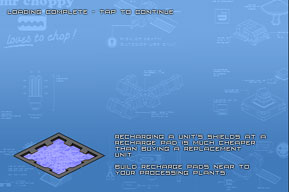
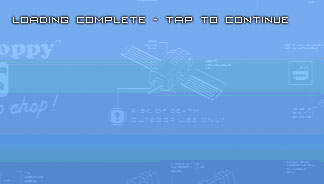
In Space Harvest, each level has a loading screen because it can take a while to pre-load the textures and load the maps that make up the game world. I thought it would be nice to include tips on how to play on the loading screen so users weren’t actually staring at nothing while each level loaded.
I performed the majority of my testing on my 3G iPhone. During the last couple of weeks before I released the first version of Space Harvest, I got to test Space Harvest on a 3GS iPhone. The first thing I noticed was that I could no longer read the tips. What might have been a ten second wait for loading on the 3G became a barely noticeable blue flash on screen before the level started on the 3GS. I ended up introducing a ‘tap to continue’ message, just to let people with newer devices see the playing tips.
So, the newer devices are faster - not just a bit faster, but a lot faster. A lot faster at loading textures, a lot faster at drawing things with OpenGL, a lot faster at just about everything. If you aren’t testing on older devices, how will you know if your game is even playable on older devices?
Ignoring the iPad for now, in performance terms, there are three classes of iPhone OS device:
- Slowest devices: iPhone / iPhone 3G / 1st gen iPod Touch(i)
- 2nd gen iPod Touch, 3rd gen iPod touch 8GB
- Fastest devices: iPhone 3GS, 32GB / 64GB 3rd gen iPod Touch
A couple of other random notes about the differences between older and newer devices:
- Older devices have half the RAM of newer devices (128MB vs 256MB), which means the likelihood of low memory warnings is much greater. This makes it even more important to manage your memory carefully.
- Older devices only support textures up to a maximum of 1024x1024 pixels. You should avoid textures larger than this size if you want your game to work on older phones and iPods.
Textures and Texture Atlases
Loading textures on the device is rather slow. Because of this, you should try to load textures before the user starts playing a level that may need them, otherwise you might get hiccups in frame rate.
When you create a sprite in Cocos2d, you’ll normally pass in a reference to the texture you want it to use, eg:
CCTexture2D *texture =
[[CCTextureCache sharedTextureCache] addImage:@"mytexture.png"];
CCSprite *sprite = [CCSprite spriteWithTexture:texture];
This helps keep things nice and simple. However, if you’re loading all your textures in advance, you may notice that loading starts to slow down on older devices - the more textures you load, the slower it gets.
Speeding up loading times
At one point during the development of Space Harvest, loading textures was taking more than 20 seconds. Just for loading textures. Once textures were loaded, the user would still have to wait for the map to load. Ouch!
The reason for this was that I hadn’t paid attention to what everyone was saying, and I wasn’t using texture atlases.
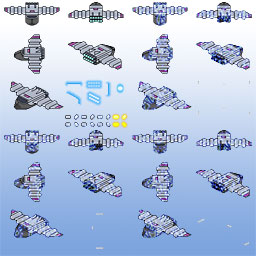
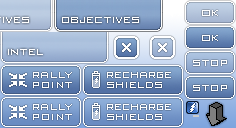
A texture atlas is basically a large image that contains lots of smaller textures. On the right is an example of one of the texture atlases used in Space Harvest.
Using a texture atlas can help speed up drawing significantly (more on this below), but equally importantly, it helps speed up texture loading, and helps reduce the amount of memory your textures will use once loaded.
Space Harvest uses lots of different sprites, some with as many as 50 frames of animation. By combining 50 textures into one texture, you’ll cut loading texture loading times significantly.
The newest versions of Cocos2d make this pretty easy. Here, we’re creating a sprite using a rectangular portion (specified in pixels) of a larger texture:
CCTexture2D *texture =
[[CCTextureCache sharedTextureCache] addImage:@"myatlastexture.png"];
CCSprite *sprite =
[CCSprite spriteWithTexture:texture rect:CGRectMake(0,0,32,32)];
Reducing memory usage
I mentioned you can also save memory by using atlas textures. This is because textures in Open GL ES must have a width and height that are a power of two, eg 64x128, 256x1024, 512x512 etc.
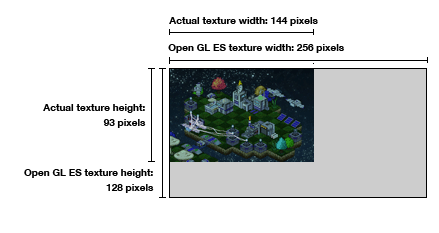
Cocos2d is smart enough to resize your images for you when it comes to loading textures, but look at all the space we’re wasting! In the above example, our 144x93 texture became a 256x128 texture once it got loaded into memory. This means we’ve ended up with more wasted space in our texture than used space!
For a single texture, this won’t be a big deal, but what happens when we load 50 textures like this? 50 times as much waste. Again, using texture atlases is a great way to solve this problem - you can easily combine lots of textures that don’t have a power of two width and height into a single texture that does.
Flipping textures
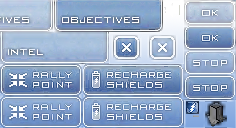
Another tip to cut down on memory usage is to use flipped textures. If your sprite looks the same when drawn facing in the opposite direction (but just horizontally or vertically flipped), you can use the same texture, and do the flipping in code by setting the flipX / flipY properties of your sprite.

In the above image, the second, third, fourth and fifth textures could be flipped horizontally to provide walls facing in the opposite direction.
Obviously, you should avoid flipping textures that might be subtly different when flipped.

Pixel formats
Cocos2d provides several different pixel formats for loading your textures. These are quite distinct from the format you use to save your texture images.
When saving a PNG image in Photoshop, I can decide whether I want to save it as an 8-bit indexed colour image, or a 24-bit truecolor image, or a 32-bit image that includes an alpha channel. The format I choose will depend on the nature of the image. 8-bit PNG is best suited for images with few colours that don’t use partial transparency. 32-bit images can have many colours and include partial transparency, though the file size will often be significantly larger.
When loading textures, the original format of the image doesn’t really matter that much - what’s important is the pixel format we use for loading. As with saving images for the web, it’s basically a question of balancing image quality and size.
kTexture2DPixelFormat_RGBA8888 is the default pixel format for textures, and provides the best image quality. It uses 8 bits for each colour (Red, Green and Blue), plus 8 bits for the alpha channel, for a total of 32 bits per pixel.
kTexture2DPixelFormat_RGBA4444 will use only 4 bits for each colour, plus 4 bits for the alpha channel, for a total of 16 bits per pixel. A texture stored in memory in this format will use half the size of one loaded with kTexture2DPixelFormat_RGBA8888.
For larger textures like atlases, this difference is very important. A 1024x1024 texture will use 4MB of texture memory when loaded with RGBA8888, but only 2MB of texture memory when loaded with RGBA4444!
Try to avoid using RGBA8888 unless you absolutely need the best possible quality for a particular texture. A lot of the time, you won’t even notice the difference between RGBA8888 and one of the other pixel formats. Gradients are a good example of where RGBA8888 is most useful:
| RGBA8888 | RGBA4444 |
|---|---|

|
|
To cut down on the number of times you have to set the pixel format, set it to the format you’re likely to use most often when your game starts:
[CCTexture2D setDefaultAlphaPixelFormat:kTexture2DPixelFormat_RGBA4444];Then, whenever you need to change the pixel format for loading a particular texture, make sure you change it back afterwards:
[CCTexture2D setDefaultAlphaPixelFormat:kTexture2DPixelFormat_RGBA8888];
CCTexture2D *texture =
[[CCTextureCache sharedTextureCache] addImage:@"buttonsatlas.png"];
[texture setAliasTexParameters];
[CCTexture2D setDefaultAlphaPixelFormat:kTexture2DPixelFormat_RGBA4444];
Considering the pixel format you’ll end up using is important when planning your texture atlases. As each loaded atlas can only have one pixel format, you should try to ensure that you keep textures that require RGBA8888 together the same atlases, so you only have to use that pixel format for those textures.
PVRTC
PVRTC is a special texture format you can use on iPhone OS devices. PVRTC textures take up less texture memory than regular textures of the same size, and can be drawn faster.
You can generate PVRTC textures from regular images using the texturetool program that comes with the Developer tools.
While PVRTC textures have some advantages, they also have one big disadvantage - compression artifacts.
| Texture from a PNG image | PVRTC texture |
|---|---|
|
|
Above is a portion of a texture atlas - on the left, the original PNG image. On the right, a portion of the preview (generated by texturetool) of the PVRTC image.
The above image is probably showing the worst-case scenario - the kind of images for which PVRTC is least well suited. Space Harvest is a 2D game, so you’re basically always looking at the textures head on. Additionally, because the visual style of Space Harvest relies on crisp, non-antialiased graphics, artifacts are that much more visible.
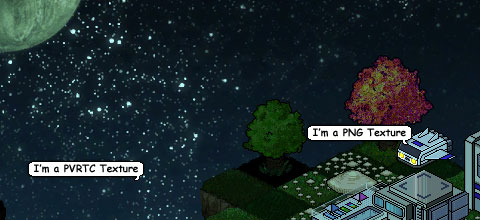
In fact, PVRTC textures can be very useful, even in 2D games. For more detailed, anti-aliased sprites, or photorealistic textures, you might not even notice the difference. Space Harvest uses PVRTC for background images. But wherever clarity is very important, you should probably avoid them.
CCSpriteSheet
CCSpriteSheet is one way to unlock big performance improvements when drawing. Each sprite sheet has a texture atlas. When we create a sprite that uses that texture atlas, we can chose to attach our sprite to the sprite sheet by adding it as a child of the sprite sheet.
Why do this? Well, our sprite sheet will take over the drawing of our sprite. Rather than drawing each sprite individually, it will draw all sprites attached to that sprite sheet at once. This matters because one of the best ways to improve performance in an Open GL application is to cut down on the number of GL calls your code makes. Cocos2d handles most of the Open GL stuff for you, but it is helpful to have an understanding of what it’s doing behind the scenes.
Here is part of the draw method for CCSprite:
BOOL newBlend = NO;
if( blendFunc_.src != CC_BLEND_SRC || blendFunc_.dst != CC_BLEND_DST ) {
   newBlend = YES;
   glBlendFunc( blendFunc_.src, blendFunc_.dst );
}

#define kQuadSize sizeof(quad_.bl)
glBindTexture(GL_TEXTURE_2D, [texture_ name]);

int offset = (int)&quad_;

// vertex
int diff = offsetof( ccV3F_C4B_T2F, vertices);
glVertexPointer(3, GL_FLOAT, kQuadSize, (void*) (offset + diff) );

// color
diff = offsetof( ccV3F_C4B_T2F, colors);
glColorPointer(4, GL_UNSIGNED_BYTE, kQuadSize, (void*)(offset + diff));

// tex coords
diff = offsetof( ccV3F_C4B_T2F, texCoords);
glTexCoordPointer(2, GL_FLOAT, kQuadSize, (void*)(offset + diff));

glDrawArrays(GL_TRIANGLE_STRIP, 0, 4);

if( newBlend )
   glBlendFunc(CC_BLEND_SRC, CC_BLEND_DST);
(Emphasis mine, obviously)
Look at the number of calls to functions that begin with ‘gl’ - 7 calls in the worst case. This code will run every time we draw a sprite that isn’t attached to a sprite sheet. If we have 100 sprites, 700 calls, or 7000 gl calls for 1000 sprites.
CCSpriteSheet’s draw method is a bit more complex, and calls a separate method on it’s texture atlas to do the drawing. For brevity, I won’t repeat it here, but it looks like it makes around 10 gl calls. But crucially, it will only make those 10 calls to draw ALL of the sprites attached to our sprite sheet - 100 sprites will be 10 calls, even with 1000 sprites, it’ll still be 10 calls. In practice, this gives you a huge boost in drawing performance.
A note about depth sorting and CCSpriteSheet
If you need to depth-sort sprites from one atlas with sprites from another, things get a bit more complex.
By default, Cocos2d renders graphics using the Painter’s Algorithm. That means that objects are drawn in the order in which they appear in their parent node’s children array. The end result is that objects at the back are drawn first, objects that appear on top of everything else are drawn last.
This presents a problem if you need some objects attached to a particular sprite sheet to be drawn in front of those from another sprite sheet, but behind others from that same sprite sheet. By default, once the sprites from the first atlas have been drawn, the sprites from the second atlas will draw over the top of them, regardless of their z position relative to their siblings.
The way around this is to use CCNode’s vertexZ property. This gives you access to Open GL’s depth buffer, which allows you to draw your sprites in any order you like, and still allow them to be correctly depth sorted in relation to one another.
The biggest downside to this approach is that it can be difficult to get semi-transparent sprites to render properly, as the object directly behind them may not have been drawn when they come to be rendered. Apple’s advice is to draw semi-transparent objects last, which in practice means you’ll need to keep their sprite sheet in a higher position in its parent’s children array.
I didn't use vertexZ for depth sorting in Space Harvest - from the couple of days I spent experimenting with it, I found lots of little side effects that made it tricky to get things working the way I wanted. Regardless, try to use CCSpriteSheet as much as you can.
Pre-render programatically generated textures if you can
Some of the effects in Space Harvest are programatically generated using Core Graphics. Many objects have animations for taking damage and being destroyed - these are created by combining different images using different blending modes:

On the left is the original image, the others were dynamically generated using Core Graphics.
Originally, I generated textures for destroy animations for all my sprites when starting the game. However, Core Graphics is rather slow on the iPhone platform, so I eventually moved to saving the generated images out, pasting them into to my atlases in Photoshop, and loading them as regular textures in the final version. This cut around 10 seconds(!) off startup time, so if you do have any programatically generated textures that don't change, pre-rendering them is a good way to go.
Other random tips
Avoid using atomic accessors
Since your game is likely to be largely single threaded, make sure you define properties that will only be accessed from the main thread as nonatomic, as this can speed up access to frequently used accessors. For accessing properties of an object within its own methods, you might want to avoid using accessors altogether in code that is called very frequently.
Read the best practices documentation
This page in the Cocos2d documentation has lots of tips for improving performance, including tweaking your build settings, choosing a Director type, and other helpful hints.
- According to Wikipedia, it looks like the very first iPod Touches had a slightly slower processor
Posted by Ben @ 3:39 PM